The most amazing thing about the ever popular Alabama Rig, or A-rig as we shall call it, is the fact that it is extraordinarily easy to manufacture. Nothing more than a glorified umbrella rig, the A-rig consists of little more than wire, swivels, and snaps. It is merely a new means to present old baits. As the next installment in my series of articles on the A-rig,
Alabama Rig Manifesto, this "How To" article will put the power of the A-rig in your hands for a mere fraction of the cost. In my humble opinion, the store bought, professionally manufactured A-rigs offer no advantages, over my home made version, to justify the cost. This article follows me, step-by-step, as I craft a four-arm A-rig out of simple, store bought materials using common, hand tools. I tried to capture a valid image that represents a significant movement in each stage of the build. Before we delve into the process, I must put up one disclaimer. If you are the suing type, please don gloves, eye protection, helmet, personal flotation device, athletic supporter, and any other pieces needed to form a protective ensemble that will stave off injury and litigation. Now, without further adieu,
How To Make An Alabama Rig.
Required Tools:
1. strong, American made diagonal cutters
2. strong, American made needle nose pliers
3. strong, American made channel lock pliers
4. vise
Required Materials:
1. orange flagged, survey stakes
2. medium gauge project wire
3. JB Weld epoxy putty
4. large, 1/0 swivels
5. large swivel snaps
 |
| Assembled Tools and Materials |
 |
| Strip flag material from wire, measure to midpoint, place in vice, and bend wire double |
 |
| Doubled survey stake wire |
 |
| Continue to bend wire into the form of an eyelet with channel lock pliers |
 |
| Bend all wires to the same shape |
 |
| Shaped wire |
 |
| Large Swivels serve as line tie |
 |
| Thread swivel onto all wires so it sits evenly |
 |
| Seated swivel for line tie |
 |
| Clip off desired length of project wire with diagonal cutters |
 |
| Secure all arms of the A-rig in a vise without bunching or binding the swivel or wire eyelets |
 |
| Run project wire under swivel between all wires |
 |
| With needle nose pliers, forcefully form wire into coil around A-rig arms |
 |
| Clip off extra wire and form fit the coil tightly around the outside of the A-rig |
 |
| Coiled wire secures swivel in place and provides strength and rigidity during battle |
 |
| Trim all exposed wire at the bottom of the arms to the same length and grasp with needle nose pliers 1/2" up shank |
 |
| Bend 270 degrees until an eyelet is formed |
 |
| Slide swivel snap into eyelet for lure connection |
 |
| Secure the outside bend of the eyelet in your vise and, with needle nose pliers, wrap the tag end of the wire around the shank of the A-rig arms spinnerbait style |
 |
| This provides a near unfailing lure attachment |
 |
| Near finished A-rig |
 |
| Swivel snap lure connectors |
 |
| Properly bound swivel line tie connection |
 |
| Tear off small, dime sized, segment of epoxy putty and work with fingers until it it properly mixed as called for by directions |
 |
| Shape around coiled project wire, careful not to impede the swivel action of the line tie |
 |
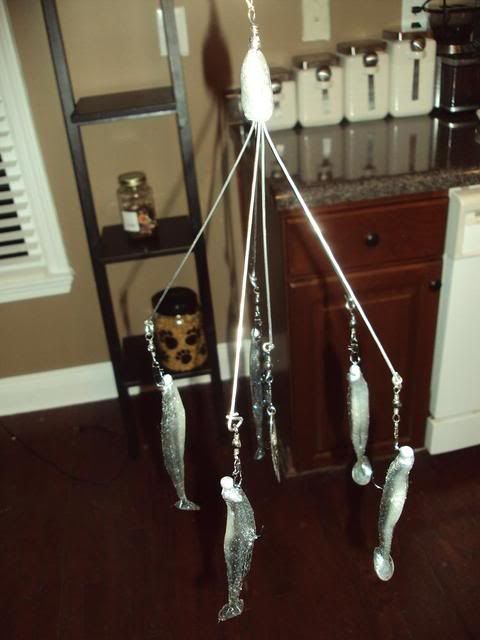
| Finished A-rig ready for swimbaits and battle! |
|
|
|
Your Alabama Rig is ready to be outfitted with whatever swimbaits you deem necessary to create the deception of a school of baitfish. I prefer using 1/8 or 1/4 quality jig heads with a quality, paddle tail swimbait that puts off plenty of vibration. To create a six arm rig, simply add one more piece of wire in the beginning step. A killer combo is the six arm rig with one arm dedicated to a willow leaf blade. Once finished, read my previous installment of
Alabama Rig Manifesto and follow the link to watch Matt Peter's Alabama Rig Supernova. A great piece of advice is to hold off pre-bending your rig arms until you tie it on or you will no fit it into your regular tackle box. Also, carry some small diameter, strong rubber bands to wrap around your rig arms and make a tidy package for storage. Good fishing everyone and feel free to add questions to the comment section.


I only have chinese made tools
ReplyDeleteBBS "Buy Better Shit"
DeleteNice replica I will make a couple for myself. Thanks
DeleteI coat my sinkers in the Stick Stuff UV rubber coating. Fish catches were tripled over the years. The Yellow UV bring small mouth bass 18-20 ft. up from the bottom with surface lures. My thoughts, color first on the umbrella rig (Sinker) then display the bait. That will piss off those bass.
DeleteI say American made because the wire will roll over the cutting edge of cheap diagonal cutters and splay out the beak of needle nose pliers. Trust me, I know. Cheap, Chinese manufacture tools use a very soft grade steel that does small crafts well, but will be rendered useless by high tensile and tool steels. You really get what you pay for with tools.
ReplyDeleteGreat "how to" article, Evan! And I agree with your assessment of American vs. Chinese made tools. The Chinese normally use a much softer grade of steel which will not last long or perform well, but are easier and cheaper to manufacture.
ReplyDeletebut me chinese and use chinese tools. You know how to make a chinese rig?
ReplyDeleteYou need to get you're hands on some real tools then before you even attempt this project.
DeleteYou make chinese rig with bamboo.
DeleteIm with Anonymous and would love a bamboo rig, and on his behalf I would like to say that the Chinese make some (if not the MOST) best fishing lures/rods & reels. I will not name the companies, but if you fish, I know you know of them. They are high quality and out beat a lot of the american brands. I'm not sure, but I would imagine they were built with Chinese tools. Round Eye, keep up the good work. Love your instructions and teachings....but I would suggest trying to keep indirect insults out of it. We should (in my opinion) all try to help each other out and educate without trying to make it into a competition. We all would come out ahead, if we could just try to get beyond the idea of "I'm better than you....nanny nanny boo boo"
DeleteI like your style, adding you to my blog roll.
ReplyDeleteThanks Daniel, I appreciate the kind words.
ReplyDeletegreat info, excellent presentation. I will be checking in throughout the year hoping to see you have caught your double digit bass. Not to be a downer, but catching a BIG one like that is much harder in the streams.I was reading info about the growth rate of smallmouth in a TWRA paper I found online, Tennessee Smallmouth Management Plan, found here - http://www.tn.gov/twra/fish/SMBPLAN/SMBPLAN%20final.pdf and is actually pretty interesting reading. Tho it is about smallmouth so maybe the largemouth do better in the riverines. Probably safe to say you will catch more and bigger fish than me no matter where you fish lol. \
ReplyDeleteWhat brand of marking flags did you use? I bought some from home depot and they break when making the bends. I made one rig by heating the wire to bend it, but I don't trust this wire and I'm sure it will break easily down the road...
ReplyDeletei have been making these for almost a year using 'piano wire' available at most all hardware stores for cheap
DeleteThanks for the kind words Don B. I, too, hope that I can get my DD this year. I will be fishing almost exclusively in waters that are known to hold large bass; Tennessee River, Coosa River, Wheeler Lake, Guntersville Lake, Weiss Lake, Lake Varner, and Rocky Mountain PFA to name a few of my favorites. It is funny, but most of the big fish you see come out of farm ponds! Luck plays a huge role in catching a DD bass, you have to intersect that fish's movements at just the right time and place. Good fishing Don B!
ReplyDeleteI am using Johnson Level and Tool brand flags. They are the only ones at my Depot. Make sure you are bending they eye of your arms to only the degree I show. Hammering, flattening, or heating the metal will overstress or mess with the temper. Either way it will break easily. Simply bend a 90 in the wire, and then crimp them with Channel Locks to form a loop with a gentle bend as seen in pictures 4 and 5. If you have more questions or problems with your build I am an open book.
ReplyDeleteOk if you wanted a 5th arm in there like the A rig, how would you do it?
DeleteThis build gives you a four or six arm rig. I, personally, add a wire and fish a six arm. I will dedicated 1 or 2 of those arms to a willow leaf spinner bait blade. It adds flash and vibration and has worked well for me.
DeleteJohnson tools is the same flags I bought. I can't bend them like you did without them snapping unless I use heat. I have made 4 baits with your design and I'm going to give them a try this weekend and see how they hold up. I made a weedless setup by only using split rings instead of barrell swivels. This way all the hooks are pointed to the inside of the rig. I tested it at my neighborhood pond and I pulled it through some nasty trees and it never hung up! My friend has been making a rigs for a couple months and he is using welding wire and it seems to hold up well. I think he said he is using .043 wire. He buys it from grainier and it is $18 for a big spool. Anyhow, thanks for the step by step, the rigs look great!
DeleteIf you go o a welding supply store and look at the stainless steel wire used for tig welding you will find that it comes in 36" lengths and differant diameters. This should be better than the mild steel that the flags use.
DeleteCan you use clothes hanger wire instead of the flag wires?
DeleteThey are not going to be stiff enough to maintain the schooling profile.
DeleteRivet head. Do 5. 5th wire leave about 1.5” to bend. Make eye. Split ring thru eye for casting sinker any size weight. Have fun
DeleteI have bought the orange flag 15" marking stick for 3.98 for a bundle of 25. Presco is the brand. Bent my first two with vise grips and they seem to hold up and not snap if you do it slow like Evan said.
ReplyDeleteI posted above about the marking flags, just wanted to get rid of the anonymous ID, thanks again!
ReplyDeleteMaybe I got a bad batch of flags but I tried to bend them fast, slow, a little at a time, etc but it would still snap like glass every time I made the sharp bends either at the swivel or while bending it down at the bottoms. I finally gave up and started using heat after ruining a few almost completed baits. With the heat it bends like butter. I figure this will weaken the metal but it was the only way I could make it happen with the stakes I have. I think I am going to buy the welding wire because my friend has found it reliable and it may be a little more consistent. But please don't think I'm dogging on your design, it is awesome and I can't wait to caTch fish on a lure I made (with your help, of course ). :)
ReplyDeleteI love innovation! I am pleased that you are putting your own spin on it; that is what it is all about! I will say that I had breakage issues when I tried to flatten the bend with a hammer, but using a gentle bend they hold solid. If my perfectionism ran a little deeper I would buy some heavy spinner bait wire, but I see no need to right now. I am not selling them, so tossing ugly baits don't bother me. Let me know how it is going for you and email me some pics if you want. If you stick some nice fish on them send them my way also. elhoward622@gmail.com
DeleteThanks! Great info on here, hopefully I can get some pics this weekend. If my buddy doesn't mind, I'll send you a pic of his arig. He has a different design, and he has been hammering the fish with it. Good luck on the water!
DeleteThe rigs worked great! We went today, it was 29 degrees when we got on the water. We boated 37 fish and missed just as many. Twice we caught 2 fish at one time, and once my buddy landed 3 bass in one cast. A 6lb, 5lb, and a 2lb. The rigs I built from your info casted very well and I had no failures or breakage even with very hard hook sets. My buddy that builds the rigs really liked them too! I have emailed you pics, feel free to post on your blog if you want. Thanks again
ReplyDeleteI bought the flags at Acce Hardware and have no problem with them. I use the same wires in various lead molds and they work fine. Evan outstanding job !!.
ReplyDeleteHow do I get rid of this Anonymous thing ?
Reply as....scroll all the way down to the bottom
DeleteThat's nice, but I think I will just buy one. Even if it cost $86'000.00 I will not be broke! JT
ReplyDeleteThanks! I think you need to create a profile with blog spot. It is nice because you can manage and follow all the blogs you like. It will link with a gmail account.
ReplyDeleteYeah, the manufactured ones are lighter and a little more efficient. But, lose a handful and you may try this out. I lost three on an outing a while back. That is around $50 or so.
ReplyDeleteHi there guys. Every one on these fishing sites always talk about fishing in places other than where I live. I live in the San Joaquin Valley in Calif. We do alot of canal fishing here and the majority of fishing advice from these sites just don't work here like they do everywhere else! Does anyone out there have any advice on these damn canal fish?! Stripers/L & S & blk Bass/ Cats.
ReplyDeleteJohnO
I like your idea and will give it a try. I like making my own lures. I used to catch over 100 keep bass in our Missouri streams with my home made buzz baits.That was before the Otters were turned loose and multiplied. Now you are luck to catch a mess of 2 or 3 small keepers. So beware of introducing the River Otter in your area. They have no limits and no seasons. They literally clean our a stream!!!unless it is larger than the upper 2/3 of the Gasconade River.
ReplyDeleteWe all loose a fish now and then and we know that the fish can live with a hook it it's mouth until it rusts out. What do you think the mortality rate will be with the A-rig? I don't think it looks good for the fish. And I don't think the A-rig or umbrella rig will be good for the sport.
DeleteI have foul hooked one fish. One. I have seen some pictures of side hooked fish, but I think it is rare. Typically, we are talking about big, soft body swimbaits and single jig hooks. That style of hook does not lend itself to foul hooking fish, especially with the "meat" of the soft plastic lure shielding most of the hook. I have foul hooked or gill hooked many fish on worms and jerkbaits, but I have done no damage with the alabama rig. I don't think it will change anything about the sport or the fishery. You are not going to break off one in a bass; we are talking about some heavy duty tackle here. Furthermore, "meat" fisherman are not using these to fill their 5 gallon buckets for dinner. This is an expensive, specialized technique that is going to be used by catch and release guys 95-99% of the time. The umbrella rig has not destroyed the striped bass fishery anywhere I know of. I think that it is a technique that is highly effective in the fall-winter transition period when bass are specifically keyed in on small schools of bait fish.
DeleteWhat are the wire guages? How long do you make the trailers? What kind of lures are best? How far do you spread the trailers from each other?
ReplyDeleteWillow blades are the way to go nice article
DeleteI am not sure on the gauge, but it is far heavier than the spinnerbait wire used in professionally manufactured ones. My trailer arms are about 11" from the initial(middle)bend. I like to use premium lures such as shadlicious, money minnows, or big hammers. I think the key is to find a swimbait that has a large tail in proportion to the body. I have used a ton of zoom swimming flukes, but they have a tiny tail and don't put out as much disturbance into the water. The premium baits work best because they have an abnormally large paddle tail. I carry super glue in my box and glue the heads to the jig collar. This will make them last exponentially longer. Also, I just put a new pic at the bottom of the article. This shows how far apart i spread the arms. I keep them pretty close together, but experiment and see what the fish want.
DeleteThanks for the step by step on this umbrella rig I am going to try and attemped to make one I dont know how well I will do but worth the try if you have anymore tips please email them to me thanks again...bhankins26@yahoo.com
ReplyDeleteI'm new at this and I was wondering if the fishing you are talking about is trolling. With all the weight trolling the alabama rig, I was concerned if I would be dragging the bottom. And if pitching it, wouldn't it get tangled?
ReplyDeleteThanks.
thank you very much! i will be selling these cheap on my website. MasterBaitLures.co
ReplyDeleteI think this is a pretty good idea,JUST remember to check your state regs.regarding the number of hooks permitted, in OHIO three is the maximum number permitted on a fishing line
ReplyDeleteLOL I'v been making that rig for about 33 years now. first one I made in jr. high school shop class. I never saw one before that. I'v had good luck with most fish from 2 lb's up.
ReplyDeleteGood stuff. I used the flags for the first one I made. Works great.
ReplyDeleteIf you want a version not quite as heavy, use the wires from a whisk.
Only cost a couple of bucks.
I have not tried much other wire. I just built a light weight rig built for chasing striped bass in rivers and will put up pretty soon.
DeleteUse barrel swivels with snaps instead of just barrel swivels. It will be way easier to add and switch lures. Www.MasterBaitLures.co
ReplyDeleteYes they do. That is what this build calls for.
Deletei found a better way to build these.....the flags are great and all but they are almost too heavy in most applications and sometimes too rigid. my very first one i built i casted one time and it was lost. I searched high and low for a better metal and after days i found one......large paper clips, bend them out straight and do everything the same. they work great.
ReplyDeletethe one i made will be perfect for casting to stripers....that is what i had in mind when i made it. And the weight of the paper clip metal is much more manageable than the flag metals. How do i post a picture?
ReplyDeleteInteresting idea. I would have some major concerns though. Bending thin metals usually causes it to lose temper; thus, becoming more brittle. Also, I would have concerns when playing really big fish. Get some fish on it and let me know how it goes!
DeleteUpload the picture to photobucket and paste the direct link code.
Deletethey are still pretty rigid...if you bend them slowly its seems to work fine...ya cant jerk them or go to fast. I have caught some small mouth without a problem. I live right on the delaware and the stripers will be here any day now and my rig WILL get tested also i have a lake ive been hitting 2-4lb largemouths but havent had a chance to use my rig yet.....I'm more worried about the metal pulling out of the putty way before the metal breaking ...but i have faith!!!
ReplyDelete[IMG]http://i68.photobucket.com/albums/i40/justkutt/IMG_4356.jpg[/IMG]
wrong link........
ReplyDelete[URL=http://s68.photobucket.com/albums/i40/justkutt/?action=view¤t=IMG_4356.jpg][IMG]http://i68.photobucket.com/albums/i40/justkutt/th_IMG_4356.jpg[/IMG][/URL]
i cant get this pic up.....one more try.
ReplyDeletehttp://i68.photobucket.com/albums/i40/justkutt/IMG_4356.jpg
I used your design, looks great and swims fine just havn't caught any fish yet, the weather in VA has gone cold and hot , temps won't stay steady, hopefully when the fry are moving it will work, thanks for the tutorial on making the rig it sure is alot cheaper than buying them and i can make one in about 5 minutes i have made 4 already and rig each one with differnt style lures, I CAN'T WAIT to land doubles or better.
ReplyDeleteIt will happen. There is so much to be learned about this style of fishing, but I firmly believe this is best used during the Fall-Early Winter transition. That is when the bass really key on schooling baitfish. I do think it can do some damage during the post spawn and even during the dog days of Summer bumping it across ledges and bass on isolated, underwater cover. At worst, the rig may not be the most effective tactic, but bass will always eat baitfish. Keep slinging it!
DeleteI posted as anonymous on 4/25/12 didn't know how to post otherwise, in addition to last post i wanted to add that i didn't use epoxy to make head to rig but, it works fine nverless and doesn't malfunction or knot up, thanks again.
ReplyDeleteInstead of survey stake, I used metal sticks from 20-inch sparkler fireworks I found in a "TNT" tent in front of Walmart. It's very cheap but rigid. The fireworks also brings children a little good time. For the epoxy part, I used white silicon filler. It costs $1-2 per tube.
ReplyDeleteFirst time caught one LM Bass yesterday in green river KY.
Thank you so much for sharing this post I like you post I also share with you some tips hope you like Remember, safety first. Make sure that your policy takes into account all roles within the organization so that the badge accessory does not interfere with your employee’s jobs or put their safety in jeopardy.ID Badge Reels
ReplyDeleteThank You and I have a neat give: How Long Do House Renovations Take home remodeling contractors
ReplyDelete